Saturday, June 1, 2013

First day of my vacation and I am excited to make day trips in my jeep exploring my part of Oregon and spending time working on my layout.  I made significant progress today being able to work outside on the porch in balmy 75-degree weather.  Glorious warm and clear day to work outside.  I was able to get some of the pad work and the road across the tracks done and painted.  I made these by slopping on plaster and smoothing it out.  Once set, did some light sanding and distressing for character. I gave it a quick shot of clear flat and then primer grey for a base.  For weathering I used MIG Brand (now out of business, but there are other's out there) washes...Brown, Light rust and Medium Wash in liberal amounts.  I used a blow dryer and moved the wash around the surface to get a random set and it came out quite convincing.  I used more rust and dark tones on the pavement between and around the tracks against the packing house sides. 

Before doing the ground work, I sprayed the track and ties with Tamaya Deck Tan XF-55 to get a bleached out effect and then used Tamaya Hull Red XF -9 on the sides of the rails for a rust effect.  I also made darker tints of the Tan mixing in brown and shooting random ties to break up the monotone of the base color.  I used an airbrush to apply all the colors.


Once the colors were set I oversprayed with Testors Clear Flat out of a can to set the paint for further washes down the road.  Next I applied the ground cover over the bulk of the module using soil pinched from under an California Overpass to remain nameless.  I love this stuff and am sure you can find something locally to fit the bill. I sift with strainers to get different grades.  Application is the usual way...white glue mixed with dark brown paint and applied liberally around the area modeled.  Then I sprinkle the ground cover and set using a spray bottle of Denatured Alcohol to wet the area and then using a small squirt bottle (empty superglue bottle works best)  soaked the area using Woodland Scenics Scenic Cement.  While it was still wet I sprinkled on some Burnt Grass foam here and there...more can be added later.  I will cover this better in another post, but the technique is standard fare and most MR books have endless articles on the subject.


Here is the base showing one side dry and a freshly applied ground cover of sifted soil.  Once the ground cover dried I took some more thinned deck tan in my airbrush and lightly blended the soil and the edges of the ballast so the difference in color was not so stark.  Next step is to distress the ties a bit and spray on a thin coat of MIG Oil and Grease down the center of the track and here and there on the pavement. 

Wednesday, May 15, 2013

OOOPS!  I mislabled my drawing and the post so far as the area being modeled is the "Mission Spur"...when in fact, it futher down the road and actually the "Chatsworth Spur"  I'll update the drawing, but for all intents and purposes the layout is the same, it's just become the "end" of the line instead of smack in the middle of it.

Wednesday, May 1, 2013

Here is a rough schematic view of the parts that have been built and tracked.  These were done several months ago, just got them out of storage and will be working on them in between pressing side jobs.  What isn't included in the original plan was the Signal Oil Depot, but I thought the splash of yellow and black was too cool to pass up.  The Chatsworth Spur measures 4'x 3' and the Run Around is 14"x6'.  All the straight tiles will be this dimension going forward.  I was going to just force track centers to mid point on the flat, but that limits what I can do.  Besides, I don't see the need to mix up the tiles in the future.  The Staging yard will be a clip on piece and not landscaped...but painted all black to make it less obvious at shows.  This piece will be 4' long.
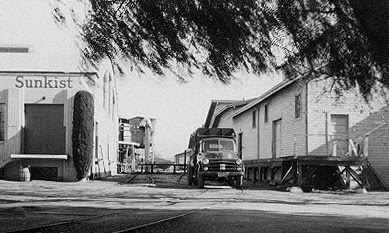
Here is a shot of the first scene I am working on snatched from the Pacific Electric Railway Historic site.  Called the Chatsworth Spur it was a pair of packing plants that were located right off Brand Avenue towards the middle of the line.  As with Bruce's design, this will be the anchor module and to the right will be a removeable section that will serve as staging track and room to  move cars back and forth.  I joined two modules together to get the correct shape, a funky corner piece with a wedge taken out and a 4'x14" straight section welded to one side.  As it happens, two parts designed for another section worked out well for this application.  

Showcase Minatures makes an HO half model of the wood sided building to the right. Showcase  As it happenes this kit will almost fit the area I have maped out, but will instead scratchbuild my own to save time and money.  The one on the left is unique and there are only a few photo's of it I could find on a google search.  Enough to get the concept down and make something.  As with any modeling, eventually you are faced with proto/fantasy and near enough, or build something else.  This will be a cool scene expecially with the large tree out front, the double street crossing and the busy details in the yard.

Monday, April 29, 2013

Productive Weekend

After a long week at work I decided to make one of my regular pilgrimages south to Dunsmuir for some "model railfanning" as Bruce Petty calls it, some good coffee and a few slices of really good pizza with my friend.  Proto trains were almost non existent thru the yard the few hours I was there, but the weather was Spring like and great for re-charging the batteries.

Major score for my fleet thanks to Bruce.  I offered to weather one of his Red Caboose/SPH&TS F70  plaster board flats. Proto and model info   In exchange he gave me an extra unit so I am now the proud owner of one of these unique flat cars.  According to Tony Thompson's bible on SP Flatcars, this version of the F70 was converted for other uses including ballistic sheet aluminum loads, railroad ties and other cool stuff. Give the area I am modeling, I may go with some sort of lumber load for a box making plant.  More model info here: Model images

If visiting Bruce and John Signor is not enough reason to go south, the local hardware store also boasts a small hobby shop and for the most part all the offerings are Southern Pacific themed with a few UP products to keep the local foamers happy.  I have to restrain my buying until I get more of the layout done, I don't want a bunch of stuff that has no business on the Orphan Spur.  The only major acquisition missing so far are the Reefers.  I think, given the short line nature of the route and the Packing Plant heavy theme, I will need to look at some of the PFE resin kits out there for something more specific and interesting to look at. I really want to cut open the doors and have them positionable...not working, but can be shown open or closed.  Ought to be an interesting project.

Friday, April 26, 2013

I want to take a few moments and recognize the resurrection of Bob Smaus' Los Angeles layout here.  I have a few personal mentors out there who have kept me focused and inspired me and then there are those trail blazers who I have never met, but are no less influential or inspirational.  Bob is one of them.  As a wanna be Gardner I used to watch him on the PBS series Victory Garden from time to time, but didn't know his modeling sideline.  Smaus Main Page  Bob did a great job of capturing the flavor of the Los Angeles experience and wrote a good many articles over the year illustrating the how's and why's.  I had dreams of building his home layout in Z someday...that may still happen if I ever get a chance to put down some roots.  I really like the flow of the thing and with the advent of more track components in the scale, it is possible to do a nice rendering of it. Rebuilt Layout

I'm still torn between Bruce Petty's PE Orphan Branch layout plan and developing one that represents the Southern Wing of the PE down to Venice Beach. 

What's not to love about a couple trolley equipped S4's and SW1's pulling a string of tank cars down an avenue like this??

Too many options theses days...damn you Internets! :o)   What ever direction I go in or scale...I think a big chunk of what Bob gave the modeling community and me, will be evident in it.  Now that he has moved up here in the moist part of the Pacific Northwest, hopefully I can drop by someday and see this magnnum opus for myself.

Back in the Saddle

It's been awhile since I was able to relax a bit and start posting again.  Due to some changes in my life I had to relocate from the isolation of my mountain top retreat back down to the bustling burb of Talent Oregon.  A sleepy little place sandwiched between the Conservative Gun Toting paint everything red white and blue city of Medford and the only Liberal bastion of political thought and lifestyle this side of Eugene, Ashland.  Talent really struggles with it's identity and owing to it's place geographically, someone middle of the road in thought and action.  The advantage is that I am within a 7 minute walk to work and have some space at my new place to expand and actually start doing some ground work on my layout.  The disadvantage is the lack of a really good coffee shop in town.  I mean the one local shop benifits from no competition, but is getting better.  I hope someday they start employing serious Barrista's and replace the clown posse they have now.  Dressing like a Bohemian doesn't mean you can brew a proper cup of Java.  So, 15 minute drives back to my beloved Ashland for a cup of coffee are minor annoyances, but once there, they are a welcome mini vacation and memories of good coffee and good food.  Back to the subject at hand...

I've mad a few acquisitions over the months, beefing up my motive power roster with the addition of two new Bachmann S-4's.  If there was ever a good deal in this world, these little beauties would be it.  Standard DC versions can be had for under $50.00 at discount on line hobby shops and those with DCC and Sound near $120.  The nice thing about the DCC units is that Bachmann designed a chip that works both with standard analog and DCC without having to switch anything.  It even makes all the correct sounds when on a regular DC track!  This way I can run my trains with my buddy Bruce Petty on his DC only track and then use the same units at my club, which is DCC only.  Very cool.   These units pull about 8 cars comfortably, lashed up I can sort 20.  Gotta love progress.


Rolling stock has been added to as well with a few old Athearn 40' PS1 box cars, a hand full of Accurail outside braced boxcars, Athearn and Atlas tank cars and the real standout of my fleet, the Intermountain F70, SP flat car.  As large as the SP fleet was in it's day, there are very few pure SP prototypes in any scale.  Most of their stuff was shop built and didn't see wide spread service on other roads until they were gobbled up by UP.  The F70 is a sweet ride and thanks to the Southern Pacific Historical Society, you can get some nifty add ons to make the Sheet Rock flats and the TOFC flats most wanted by modelers. SP F70 Flatcar upgrades   I will be ordering 5 of the TOFC flats for a future project as soon as my fun kitty fills up again.