Tuesday, June 11, 2013

Color in a black and white era.

Well, color has always been there of course, but color photography was not as common in publications in the era I model.  Figuring out what color things are using black and white photographs is a fine art that escapes me, so I tend to rely on other's who have better resources or have salvaged things and just now bringing them to lite.  Case in point..there's no shortage of color reference for Sunkist on the web, but to find a shot of a period piece, preserved is a rare treat.  A company local to the original packing house saved the marque portion of the front of the structure and incorporated it into their office space.  When I worked with Disney some of the projects required doing faux details like this and getting them to look weather worn was always a difficult task.  Here, mother nature did the hard work for them.  Anyway, photo's  like this are great resources and inspiration to dig a bit deeper into your project.
I have to admit, if I owned my own house, I would do my model room just like this.  cool.  Here is a shot of the original building being dismantled.
And a iconic shot of the building with a Santa Fe CF-7 diesel drifting through the scene.  This shot is one of the images that got me interested in doing a citrus based layout.  While I live in Oregon now, I still have great memories of living in Ventura when I was younger and remember the Eucalyptus trees and endless days of fog and cool breezes.  How you get that into HO scale, I don't know, but recreating scenes that inspire memories is what most of us strive for.


As with any plan, be prepared to accept that it will never work out the way you have it imagined.  Low expectations maybe, but I keep this in mind so that I'm not too overly disappointed when things don't quite go the way I want it to.  Case in point was all the work I had planned for my time off last week.  I have a number of z scale repaints I am working on but waiting for the decals to show up.  I normally pull this off with my Alps, but cannot get the stupid thing to do overlays for color.  Thankfully PE is all white and black and those functions work very well. 

So, I painted the shells and started working on my module some...and then life got in the way....or lets just say, the weather got real nice and I needed to be outside to soak up some vitamin D after a long sunless winter.  I did follow through with some research, went north to attend the SP in Oregon meeting in Eugene, went to the beach (no easy task in Oregon) and paid a visit to my great friend and favorite layout in Dunsmuir...that would be Bruce Petty and his Burbank Junction Layout in that order.
It was a nice visit and got to run a few trains around the layout.  I dropped of some weathering work I did for Bruce and added to his tank car fleet.  A chance to run on his layout is worth the self imposed price of admission. :o)

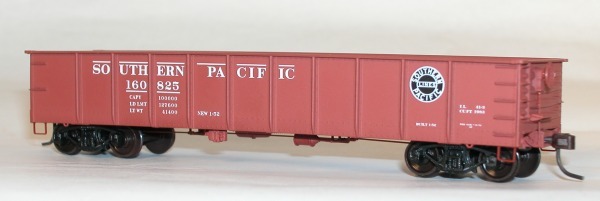
I did stop at a small hobby shop in Roseburg Oregon on my way back from the show in Eugene and scored a few new additions to my modest fleet.  The prize was a pair of Accurail 40' Gondola's that will go along well with the three PE drop bottom gons I got last year.  Those 5 cars should be all I need going forward as there's not much need for gons on the Mission Spur in real life.  But they do offer some variety and I can pack them with all sorts of loads to break up the routine.  I also picked up an Athearn flat with a pair of SP short trailers in Daylight Scheme...important splash of color here and there on the line. 
This is a raw shot, mine are weathered now and once the weather clears (yes, got cold and cloudy again) I'll shoot them.

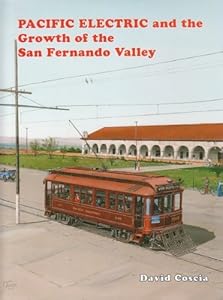
Another score thanks to Bruce was the loan of the new PE book on the San Fernando Valley which solves three major research projects:  one, what does the rest of the structures at the Chatsworth Spur look like, What's at Mission Spur and what does the front of the PE Plymouth Switcher look like.  Ample info on all of these issues is provided and I can move forward.  As noted in the intro, I don't get too worked up when plans fall short, but in this happy instance, stuff is coming together.  I though much of this would be "fly by the seat" modeling, but armed with reader submissions and this new book, I have a handle on what's going to happen.


Tuesday, June 4, 2013

R&R

Finally got some time off and at the Oregon Coast a few miles from here.  I was going through my camera and had some more images of the work so far on the Chatsworth Spur.  I extended the pavement around to what will be the front of the building for parking and loading.  Again, taped off the area, smoothed on some plaster tinted with concrete dye, sanded and distressed.  I sealed the plaster with flat lacquer spray and then airbrushed a medium tan to blend.  Once dry I did some washes and oversprays to highlight everything.  Next, the Sunkist Building when I get back home and work on the 6' extension on the with the runaround as shown in the drawings.  I ordered a few Walther's switches for the rest of the layout before I left since Atlas won't be able to restock theirs till the end of the year it looks like. 
\


Sunday, June 2, 2013

Jim Lancaster, who created the definitive Southern California Citrus Industry website sent along this link of some overhead shots of the general area being modeled. Thanks Jim!! Area photos of Chatsworth Spur

Today I let the base settle and work on the buildings...The plan is to cut the end of the Sunkist building to match the back edge of the module and finish out with paint and detail.  The wood structure across the tracks will be removable so I can get access to photograph.  I am using my camera to construct the scenes here so I don't have to do digital gymnastics to get shots going forward.  Read any John Olson article in the railroad press and you can see how effective displaying modeling in a compressed area can be achieved when you do the work up front.  John's seminal work on the Mescal Lines and the Jerome and Southwestern are inspirational.

Also...thanks to Jim I have a better overall view of the Sunkist building and will be redoing it this morning.  Too many windows and I think a bit too tall.  You can't underestimate the value of distance shots of an area to model.  Another challenge will be getting that huge tree in the front corner of the building modeled...that will need to be removable as well.

Saturday, June 1, 2013

First day of my vacation and I am excited to make day trips in my jeep exploring my part of Oregon and spending time working on my layout.  I made significant progress today being able to work outside on the porch in balmy 75-degree weather.  Glorious warm and clear day to work outside.  I was able to get some of the pad work and the road across the tracks done and painted.  I made these by slopping on plaster and smoothing it out.  Once set, did some light sanding and distressing for character. I gave it a quick shot of clear flat and then primer grey for a base.  For weathering I used MIG Brand (now out of business, but there are other's out there) washes...Brown, Light rust and Medium Wash in liberal amounts.  I used a blow dryer and moved the wash around the surface to get a random set and it came out quite convincing.  I used more rust and dark tones on the pavement between and around the tracks against the packing house sides. 

Before doing the ground work, I sprayed the track and ties with Tamaya Deck Tan XF-55 to get a bleached out effect and then used Tamaya Hull Red XF -9 on the sides of the rails for a rust effect.  I also made darker tints of the Tan mixing in brown and shooting random ties to break up the monotone of the base color.  I used an airbrush to apply all the colors.


Once the colors were set I oversprayed with Testors Clear Flat out of a can to set the paint for further washes down the road.  Next I applied the ground cover over the bulk of the module using soil pinched from under an California Overpass to remain nameless.  I love this stuff and am sure you can find something locally to fit the bill. I sift with strainers to get different grades.  Application is the usual way...white glue mixed with dark brown paint and applied liberally around the area modeled.  Then I sprinkle the ground cover and set using a spray bottle of Denatured Alcohol to wet the area and then using a small squirt bottle (empty superglue bottle works best)  soaked the area using Woodland Scenics Scenic Cement.  While it was still wet I sprinkled on some Burnt Grass foam here and there...more can be added later.  I will cover this better in another post, but the technique is standard fare and most MR books have endless articles on the subject.


Here is the base showing one side dry and a freshly applied ground cover of sifted soil.  Once the ground cover dried I took some more thinned deck tan in my airbrush and lightly blended the soil and the edges of the ballast so the difference in color was not so stark.  Next step is to distress the ties a bit and spray on a thin coat of MIG Oil and Grease down the center of the track and here and there on the pavement.